SpringBoot集成Thymeleaf(六)
SpringBoot集成Thymeleaf从入门到精通(全)
目录
- SpringBoot集成Thymeleaf
- 1. 关闭缓存
- 2. 表达式
- 3. 常用属性
- 4. 遍历元素
- 5. 条件判断
- 6. 字面量
- 7. 字符串拼接
- 8. 数学运算
本篇文章的学习
在这之前可以补充springboot的基础
详情可看我之前的文章
springboot从入门到精通(全)
SpringBoot集成Thymeleaf
- Thymeleaf 是一个流行的模板引擎,该模板引擎采用 Java 语言开发
- Thymeleaf 是另外的一种模板技术,它本身并不属于 Spring Boot,Spring Boot只是很好地集成这种模板技术,作为前端页面的数据展示
在创建模板的时候还需要多选择一个这个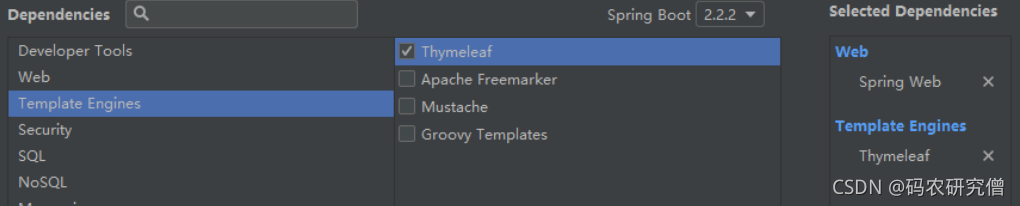
之后默认会自动添加这些依赖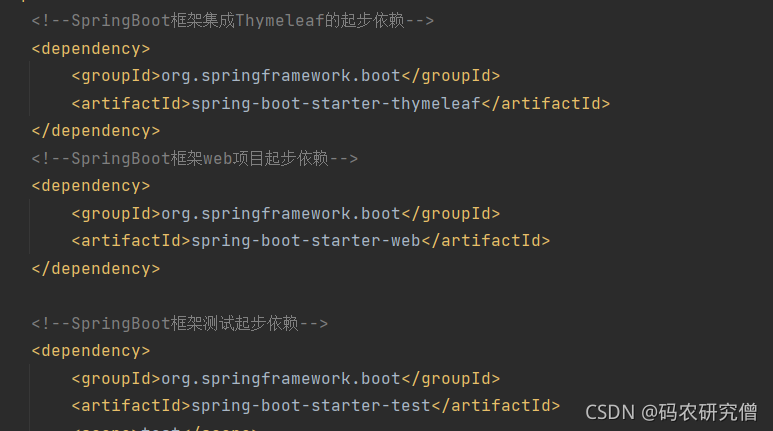
Springboot 使 用 thymeleaf 作 为 视 图 展 示 , 约 定 将 模 板 文 件 放 置在
目录下,静态资源放置在 src/main/resource/templates
目录下 src/main/resource/static
创建一个控制层面
 @Controller

public class UserController {

  @RequestMapping(value = "/message")

public String message(Model model) {


    model.addAttribute("data","SpringBoot集成Thymeleaf模版引擎");


    return "message";

}

 }
页面这个要配置在特定的目录下
还要加上名称空间才能用她的函数
xmlns:th="http://www.thymeleaf.org"具体使用名称空间的text后的数据,如果有数据传入就会将其替代,如果没有数据才会显示后面的内容
具体底层是html,通过这个名称空间,以及他的函数才可以进行加载识别参数
xmlns:th=“http://www.thymeleaf.org”
xmlns -> 命名空间
命名空间后面的地址是一个约束文件,约束你使用thymeleaf表达式
的一个规则文件,就好比我们之前在xml文件中的一此dtd文件
   <!  DOCTYPE   html  >

   < html   lang   =  " en "     xmlns: th   =  " http://www.thymeleaf.org "   >

   < head  >

       < meta   charset   =  " UTF-8 "   >

       < title  >  Title   </ title  >

   </ head  >

   < body  >

 <!--

    thymeleaf模版引擎的页面必须得通过中央调度器

-->

   < h2    th: text   =  " ${data} "   >  展示要显示的内容0   </ h2  >

   </ body  >

   </ html  >
配置后启动
 @SpringBootApplication

public class Application {

  public static void main(String[] args) {

    SpringApplication.run(Application.class, args);

}

 }
</p> <p>也可以配置一个视图解析器<br />默认是有视图解析器的<br />所谓的视图解析器,下面才是真实跳转的路径</p> <pre class="prettyprint"> <code class="prism language-xml has-numbering" style="position: unset">#设置thymeleaf模版引擎的前/后缀,(可选项)<br />
spring.thymeleaf.prefix=classpath:/templates/<br />
spring.thymeleaf.suffix=.html<br />
<div class="hljs-button {2}" data-title="复制" data-report-click="{"spm":"1001.2101.3001.4259"}"></div>为什么使用了th前缀就可以获取后台数据?
那是因为项目中添加了thymeleaf的核心依赖,它的核心依赖会去
解析thymeleaf自己定义的这些标签名称,通过thymeleaf自己的java核心代码来获取我们的后台数据
html 不会认识${}语法。
请求的流程是,发送请求给服务器,服务器接收请求后,处理请求,跳转到指定的静态 html 页面,在服务器端,Thymeleaf 模板引擎会按照它的语法,对动态数据进行处理,
所以如果要是 th 开头,模板引擎能够识别,会在服务器端进行处理,获取数据;如果没有以 th 开头,那么 Thymeleaf 模板引擎不会处理,直接返回给客户端了
1. 关闭缓存
不用再进行编译只有修改代码,刷新网页就会有显示
 #设置thymeleaf模版引擎的缓存,设置为false关闭,默认为true开启

spring.thymeleaf.cache=false
之所以thymeleaf可以代替jsp,是因为jsp要渲染,编译了才可执行
还需要额外配置启动的更新资源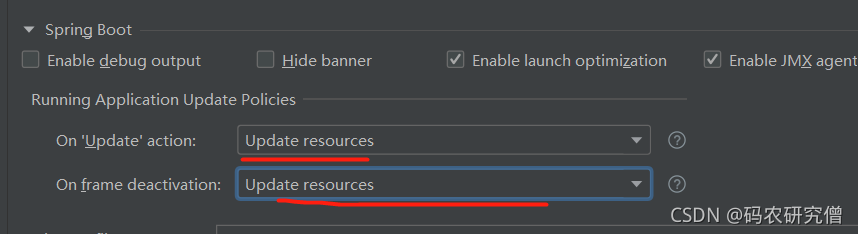
2. 表达式
要配置一个依赖
    < dependency  >

       < groupId  >  org.springframework.boot   </ groupId  >

       < artifactId  >  spring-boot-starter-thymeleaf   </ artifactId  >

   </ dependency  >
Thymeleaf 中的变量表达式使用 ${变量名} 的方式获取 Controller 中 model 其中的数据
th:text="" 是 Thymeleaf 的一个属性,用于文本的显示
- 向 model 放入 User 对象
 public class User {

  private Integer id;


private String username;


private Integer age;


public Integer getId() {

    return id;

}


public void setId(Integer id) {

    this.id = id;

}


public String getUsername() {

    return username;

}


public void setUsername(String username) {

    this.username = username;

}


public Integer getAge() {

    return age;

}


public void setAge(Integer age) {

    this.age = age;

}

 }
- 创建 user.html 页面获取 User 对象数据
 @RequestMapping(value = "/user/detail")

public ModelAndView userDetail() {

    ModelAndView mv = new ModelAndView();

    User user = new User();

    user.setId(1001);

    user.setAge(23);

    user.setUsername("lisi");

  mv.setViewName("userDetail");

mv.addObject("user",user);


return mv;

 }
标准变量表达式
${}html页面的主要功能
    < h1  >  标准变量表达式:${} -> (推荐)   </ h1  >

用户编号:   < span    th: text   =  " ${user.id} "   >     </ span  >     < br  />

用户姓名:   < span    th: text   =  " ${user.username} "   >     </ span  >     < br  />

用户年龄:   < span    th: text   =  " ${user.age} "   >     </ span  >     < br  />
选择变量表达式
{}必须使用th:object属性来绑定这个对象
在div子标签中使用 来代替绑定的对象${user}
    < h1  >  选择变量表达式(星号表达式):*{} -> (不推荐)   </ h1  >

 <!--

    *{}必须使用th:object属性来绑定这个对象

    在div子标签中使用*来代替绑定的对象${user}

-->

   < div    th: object   =  " ${user} "   >

    用户编号:   < span    th: text   =  " *{id} "   >     </ span  >     < br  />

    用户姓名:   < span    th: text   =  " *{username} "   >     </ span  >     < br  />

    用户年龄:   < span    th: text   =  " *{age} "   >     </ span  >     < br  />

   </ div  >

    < h1  >  标准变量表达式与选择变量表达式的混合使用(不推荐)   </ h1  >
用户编号   < span    th: text   =  "  {user.id} "     >       </ span  >     < br  />
用户年龄   < span    th: text   =  "     "  >    </ span  >     < br  />
用户姓名   < span    th: text   =  " *{user.username} "   >     </ span  >     < br  />
下面讲解的是路径表达式中常用的区别
路径表达式
@{...}- 绝对路径跳转(不带参数)
    < a   href   =  " http://www.baidu.com "   >  传统写法:跳转至百度   </ a  >     < br  />

   < a    th: href   =  " @{http://www.baidu.com} "   >  路径表达式:路径到百度   </ a  >     < br  />

   < a    th: href   =  " @{http://localhost:8080/user/detail1} "   >  跳转至:/user/detail1   </ a  >     < br  />

   < a   href   =  " http://localhost:8080/user/detail1 "   >  传统写法跳转至:/user/detail1   </ a  >     < br  />
- 相对路径跳转(不带参数)
    < h2  >  URL路径表达式,相对路径[没有参数](实际开发中推荐使用的)   </ h2  >

   < a    th: href   =  " @{/user/detail1} "   >  跳转至:/user/detail1   </ a  >     < br  />
- 绝对路径跳转(带参数)
    < h2  >  绝对路径(带参数)(不推荐使用)   </ h2  >

   < a   href   =  " http://localhost:8080/test?username= ' zhangsan '  "   >  绝对路径,带参数:/test,并带参数username   </ a  >     < br  />

   < a    th: href   =  " @{http://localhost:8080/test?username=zhangsan} "   >  路径表达工写法,带参数:/test,并带参数username   </ a  >     < br  />
- 相对路径跳转(带参数)
    < h2  >  相对路径(带参数)   </ h2  >

   < a    th: href   =  " @{/test?username=lisi} "   >  相对路径,带参数   </ a  >

    < h2  >  相对路径(带参数:后台获取的参数值)   </ h2  >
 <!--/test?username=1001-->
   < a    th: href   =  " @{ ' /test?username= ' +${id}} "   >  相对路径:获取后台参数值   </ a  >       < h2  >  相对路径(带多个参数:后台获取的参数值)   </ h2  >
 <!--
/test1?id=1001&username=zhaoliu&age=28
-->
   < a    th: href   =  " @{ ' /test1?id= ' +${id}+ ' &username= ' +${username}+ ' &age= ' +${age}} "   >  相对路径(带多个参数:后台获取的参数值)   </ a  >
   < a    th: href   =  " @{/test1(id=${id},username=${username},age=${age})} "   >  强烈推荐使用:@{}相对路径(带多个参数:后台获取的参数值)   </ a  >     < br  />
   < a    th: href   =  " @{ ' /test2/ ' +${id}} "   >  请求路径为RESTful风格   </ a  >     < br  />
   < a    th: href   =  " @{ ' /test3/ ' +${id}+ ' / ' +${username}} "   >  请求路径为RESTful风格   </ a  >     < br  />
在控制层面的代码为
 @RequestMapping(value = "/user/detail1")

public String userDetail1(Model model) {

    User user = new User();

    user.setId(1002);

    user.setAge(24);

    user.setUsername("wangwu");

  model.addAttribute("user",user);


return "userDetail";

 }  @RequestMapping(value = "/url")
public String urlExpression(Model model) {   model.addAttribute("id",1001);

model.addAttribute("age",28);

model.addAttribute("username","zhaoliu");


return "url";

 }  @RequestMapping(value = "/test")
public @ResponseBody String test(String username) {
return "请求路径/test,参数是:" + username;
}  @RequestMapping(value = "/test1")
public @ResponseBody String test1(Integer id,String username,Integer age) {
return "请求路径/test1,参数id=" + id+",username="+username+",age="+age;
}  @RequestMapping(value = "/test2/{id}")
public @ResponseBody String test2(@PathVariable("id") Integer id) {
return "ID="+id;
}  @RequestMapping(value = "/test3/{id}/{username}")
public @ResponseBody String test3(@PathVariable("id") Integer id,
@PathVariable("username") String username) {
return "ID="+id+"----username="+username;
}
3. 常用属性
| 属性 | 描述 |
|---|---|
| th:action | th:action 定义后台控制器的路径,类似标签的 action 属性,主要结合 URL 表达式,获取动态变量 |
| th:method | 设置请求方法 |
| th:href | 定义超链接,主要结合 URL 表达式,获取动态变量 |
| th:src | 用于外部资源引入,比如 |
| th:id | 类似 html 标签中的 id 属性 |
| th:name | 设置名称 |
| th:value | 类似 html 标签中的 value 属性,能对某元素的 value 属性进行赋值 |
| th:attr | 给 HTML 中某元素的某属性赋值,好处是可以给 html 中没有定义的属性动态的赋值 |
| th:text | 用于文本的显示,该属性显示的文本在标签体中,如果是文本框,数据会在文本框外显示,要想显示在文本框内,使用 th:value |
| th:object | 用于数据对象绑定,通常用于选择变量表达式(星号表达式) |
| th:onclick | 点击按钮 |
| th:style | 设置样式 |
| th:each | 后台传来一个对象集合那么就可以使用此属性遍历输出,它与JSTL 中的 |
| th:inline | 有三个取值类型 (text, javascript 和 none),值为 none 什么都不做,没有效果 |
比如
    < form   method   =  " get "    action   =  " http://localhost:8080/test1 "   >

    用户编号:   < input   type   =  " text "    name   =  " id "    />     < br  />

    用户姓名:   < input   type   =  " text "    name   =  " username "    />     < br  />

    用户年龄   < input   type   =  " text "    name   =  " age "    />     < br  />

       < input   type   =  " submit "    value   =  " submit "   />

   </ form  >
内敛文本(th:inline=”text”)
    < div    th: inline   =  " text "   >

  数据:[[${data}]]

    </ div  >
//或者直接使用
数据outside:[[${data}]]
内敛脚本(th:inline=”javascript”)
    < h1  >  内敛脚本 th:inline="javascript"   </ h1  >

   < script   type   =  " text/javascript "      th: inline   =  " javascript "   >     function   showData  (  )   {

         alert  (  [  [ $ { data }  ]  ]  )  ;

         alert  (  "----"  )  ;

     }      </ script  >

   < button    th: onclick   =  " showData() "   >  展示数据   </ button  >
4. 遍历元素
此处只po出关键代码
遍历List 集合
 @RequestMapping("/each/list")

public String eachList(Model model) {

    List  userList = new ArrayList ();
  for (int i = 0; i < 10; i++) {

    User user = new User();

    user.setId(100 + i);

    user.setNick("张" + i);

    user.setPhone("1361234567" + i);

    user.setAddress("北京市大兴区" + i);

    userList.add(user);

}

model.addAttribute("userList", userList);

model.addAttribute("data", "SpringBoot");

return "eachList";
 }
user 当前循环的对象变量名称(随意)
userStat 当前循环对象状态的变量(可选默认就是对象变量名称+Stat)
${userList} 当前循环的集合
count: 当前迭代对象的个数(从 1 开始计算)这两个用的较多
size: 被迭代对象的大小
current: 当前迭代变量
even/odd: 布尔值,当前循环是否是偶数/奇数(从 0 开始计算)
first: 布尔值,当前循环是否是第一个
last: 布尔值,当前循环是否是最后一个
注意:循环体信息 interStat 也可以不定义,则默认采用迭代变量加上 Stat 后缀,即 userStat
    < div    th: each   =  " user,userStat:${userList} "   >

       < span    th: text   =  " ${userStat.index} "   >     </ span  >

       < span    th: text   =  " ${userStat.count} "   >     </ span  >

       < span    th: text   =  " ${user.id} "   >     </ span  >

       < span    th: text   =  " ${user.nick} "   >     </ span  >

       < span    th: text   =  " ${user.phone} "   >     </ span  >

       < span    th: text   =  " ${user.address} "   >     </ span  >

   </ div  >

    < div  >     </ div  >
   < div    th: each   =  " user:${userList} "   >
   < span    th: text   =  " ${userStat.index} "   >     </ span  >
   < span    th: text   =  " ${userStat.count} "   >     </ span  >
   < span    th: text   =  " ${user.id} "   >     </ span  >
   < span    th: text   =  " ${user.nick} "   >     </ span  >
   < span    th: text   =  " ${user.phone} "   >     </ span  >
   < span    th: text   =  " ${user.address} "   >     </ span  >
   </ div  >
遍历Map 集合
 @RequestMapping(value = "/each/map")

public String eachMap(Model model) {

    Map userMaps = new HashMap();

  for (int i = 0; i < 10; i++) {

    User user = new User();

    user.setId(i);

    user.setNick("李四" + i);

    user.setPhone("1390000000" + i);

    user.setAddress("天津市" + i);

    userMaps.put(i, user);

}

model.addAttribute("userMaps", userMaps);

return "eachMap";

 }
< div th: each = " userMap,userMapStat:${userMaps} " >
< span th: text = " ${userMapStat.count} " > </ span >
< span th: text = " ${userMapStat.index} " > </ span >
< span th: text = " ${userMap.key} " > </ span >
< span th: text = " ${userMap.value} " > </ span >
< span th: text = " ${userMap.value.id} " > </ span >
< span th: text = " ${userMap.value.nick} " > </ span >
< span th: text = " ${userMap.value.phone} " > </ span >
< span th: text = " ${userMap.value.address} " > </ span >
</ div >
< div th: each = " userMap:${userMaps} " >
< span th: text = " ${userMapStat.count} " > </ span >
< span th: text = " ${userMapStat.index} " > </ span >
< span th: text = " ${userMap.key} " > </ span >
< span th: text = " ${userMap.value} " > </ span >
< span 标签: Java
- 上一篇: 关于python代码目录结构
- 下一篇: 生产系统CPU飙高问题排查